Monday, July 1, 2013

Won't you dine with me?

Before I get started tackling all the rooms (paint will be first!) I have been creating inspiration boards. Here is our dining room inspiration:

All pieces from Restoration Hardware


I love RH, but I don't love the prices. Instead of buying our dining room table, dining bench and sideboard through RH, we've contracted a local Austin woodworker to make the pieces for us. We are so excited to support a local Austinite and to not pay $7500(!!!!!!!!) for the three pieces.

We're so excited in fact that we've already been talking about Craig building us our coffee table and wall unit! Hooray!

We won't get the pieces in until August(ish), but that's okay because I have plenty of painting and other items to get done before then.

Have you ever hired someone local to build you furniture?


Friday, June 28, 2013

Plans... Big Plans

Hey everyone, sorry I've been absent this week. I've been planning things out, and anyone who knows me, knows that when I plan, I plan big. Why am I planning? Well, while we were soaking up the beauiful weather in sunny San Diego, it was decided that Matt and I would host Christmas. Christmas for the Ambroso's means 11-13 people under one roof which is great! Except our lack of furniture. Our severe, severe lack of furniture.

So, as I spend the next slightly less than 6 months filling my house, I want to take you through the process. There will be lots of things to do and lots to discuss over the next few months! I have a list of things I want to accomplish before Christmas, and linked are items/colors/accessories I love/hope to get (or something like it) for each room.

Living Room:
1. Mount TV (new TV?)
2. Couch
3. Rug
5. Media console

Library/Office/Random Space:
1. Wall unit with built in desk
3. Decor

Breakfast Area:

Dining Room:
5. Rug
6. Decor

Formal Sitting Room:
1. Chairs
3. Couch?
4. Rug
5. Coffee Table
5. Decor

Half Bathroom:
1. Accessories
2. Rug
3. Art/Decor

Guest Bedroom #1:
1. Paint
2. Bedroom set (queen size)
3. Decor

Guest Bedroom #2:
1. Paint
3. Mattress
4. Dresser
5. Decor
6. Desk (this will be my office)

Guest Bedroom #3:
1. Paint
2. Bedroom set (queen size)
3. Decor

Game Room:
1. Paint
5. TV
6. Decor

Upstairs Bathroom:
1. Paint cabinets (hardware)
2. Accessories

So, will you join me on my journey? I'm starting with the half-bath tonight and will be moving on from there!


Tuesday, June 25, 2013

Back in the Music Capital of the World

Oh, hey! I'm back in ATX and have been a bit busy since I got home, BUT, I will be back to talk about plans. Lots and lots of plans. Why, you ask? I will tell you later.

And no, I am not pregnant.


Friday, June 21, 2013

Inspiration Board: Living Room

Why hello there! I'm in San Diego right now, soaking up the sun, spending time with family and eating delicious food... you can be a little bit jealous, it's okay!

While I'm here though, I'm still thinking about projects. The next one on our list is our living room (not to be confused with the formal sitting room or upstairs game room). Matt and I put together an inspiration board for our living room and thought maybe, just maybe one or two of you would like to see it (I'm looking at you mom!)


Do you put together inspiration boards? Happy Friday!


Thursday, June 20, 2013

Thrifty Thursday: Bronzer and Highlighters

As you know, I love HACing (highlighting and contouring) which means I use some bronzer and shiny, shimmery highlighter. But, these can be hard to purchase if you don't know what you're looking for, what color you need or where to begin.

Bronzer: You want something matte, no shimmer whatsoever. You're trying to create a shadow, and shadows are not shimmery. If you are pale, like me, please, please, please do not buy a dark bronzer. The bronzer I use is made by Too Faced and is the Milk Chocolate Soleil Light/Medium Matte Bronzer. The downside is that it's $30.


If the thought of spending $30 on bronzer doesn't scare you, it's wonderful for light skin! They do have one for darker skin as well, it's the Chocolate Soleil Medium/Deep Matte Bronzer.

If you can't imagine spending $30 on bronzer, here are some other options for you: 


As for highlighting, you do want to pick something with some shimmer. However, make sure that you choose the shimmer color that works best with your skin tone. I tend to stick with a gold shimmer, whereas someone with a cool skin tone can do silver based. The "go-to" highlighter is Nars Albatross, but at $29 it's quite the investment. 


My favorite highlighter is similar in color to Albatross, but definitely not in price. It's Sephora's Microsmooth Luminizer in Light Beam (gold based), but they also have Stardust (silver based). The best part is, it's $12!


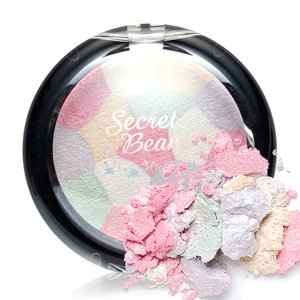
If $12 is still too much for you to spend on highlighter, check out Etude House's Secret Beam Highlighter #2 Gold & Beige Mix at $6.88 it definitely doesn't break the bank. 


Etude House also has their Pink and White Mix which is great for cooler skin tones.


I hope this helps with your quest to find the perfect bronzer and highlighter! 

And don't forget to get a good brush. It's costly (totally worth it), but the Sephora #56 is amazing for both highlighting and contouring (just make sure you clean it in between!)


Happy Thursday, friends!


Tuesday, June 18, 2013

Emma Stone

Emma Stone may have been born a blonde, but lucky for her, she looks natural as a blonde, redhead or brunette. One of the things I love is how versatile her look is, and how well she tailors her makeup to her hair color. 

Here are some of my favorite makeup looks from Emma:

1. This look is so lovely and natural. The hint of pink on her lips and cheeks give just enough warmth. And her smile looks genuine (which always helps!)


2. Still natural, but with more going on with her eyes. I like the hint of copper/gold with her blue eyes.


3. First of all, her hair color is do dye for (see what I did there?)! The mauve color on her lips helps bring out both the green in her eyes, and compliments her hair color nicely. I like the simple eye makeup with liquid liner and highlighting on the inner corners.


4. Emma's smokey eyed look is great here and since her hair is dark, her eyes don't look gothic or dark. Notice how she used grey around her eyes instead of black since her skin is so fair. She used a nude lip color and a hint of peach on her cheeks.


5. Emma's dark lips are the highlight of this look. She keeps her eyes simple and bright and let's her lips do the talking. 


6. It looks like Emma has a little bit of mauve/violet on her eyelids here which really help her eyes pop. Again she used a natural pink lip color and peach blush. I love that she let her freckles show through!


Sidenote: Her hair always looks amazing.

Do you love Emma's look as much as I do?

Also, after my Skype date with Shawna Saturday morning, I decided I wanted to help more women feel great about themselves so I've come up with 2 options. 1) If you are in the Austin area, I would love to set up a time to look at your makeup collection, make suggestions of items that would work for your skin color/type and walk you through applying a versatile makeup look (or at least getting the basics). 2) If you are not in the Austin area, we could set up a time to Skype/Facetime as I walk you through doing your makeup. You would send pictures of your items beforehand, and again, I would suggest some items to you in your budget.

If you're interested, let me know!

Monday, June 17, 2013

Monday Makeover: Hall Half-Bath

This is what our downstairs half-bathroom looked like before we moved in:


I hated how big of an area the vanity took up, knew I wanted a pedestal sink, and decided it needed to go before the painters got there to paint the room. And so it did. It took Matt and our friend Jason, and quite a few hours, but then it was gone. 

And it stayed gone. For 10 months. I have no photographic evidence of this because it was so terrible looking. We had a half bathroom, 1/4 of it with no flooring and no sink. For 10 whole months.

In March, we got our flooring done (I know I still need to post about that). And FINALLY! We had the pedestal base installed. Half a sink! YES. 

And there it sat unfinished. For another month until Matt's parents and grandparents were coming into town (the next day!). $70 and 30 minutes later we had a fully functioning sink. It was glorious.

Here is where we are:


MUCH better than having no sink and no flooring. However, it's been sitting like this for almost two months and I haven't done anything else to it yet. So I need to get my booty in gear!

Things yet to come with to this bathroom:

*Decoration
*New toilet paper/towel holder
*New rug
*Did I mention some decoration?

Any ideas for this bathroom and what to do? I welcome any and all ideas...


Thursday, June 13, 2013

Thrifty Thursday: Cutting Cable

Matt and I don't have cable. In fact, we never had cable (at least at our home/apt). When we first got in our apartment, we were so set on paying off student loans and our car payment that cable was the last thing on our mind. We had free Hulu and a Netflix subscription - and that was fantastic for us. Total cost per month: $9


Once we bought an X-Box, we decided to pay for Hulu Plus as well, that way we could watch shows from Hulu directly from the X-Box (you can't do it without Plus). Total cost per month: $17

Right now, it looks like Time Warner Cable has TV and internet for $79.99, I'm not sure if that includes DVR or what channels are included, but even with us paying $33/month for internet that still brings our total cost $50 per month. 
We might not have no cable forever, but for now, it's what works for us. 

Do you have cable? If not, what do you do for TV?


Wednesday, June 12, 2013

What I Wore Wednesday: #5


Sunday Funday. Also known as the day I went to a birthday party and didn't eat cake or ice cream. Why? Because I bought a swimsuit right before I went. And let me tell you, looking at Victoria's Secret models in magazines and trying on the same swimsuit crushes your hopes and dreams. What am I doing about this? Not eating cake or ice cream. And going to the gym... two days in a row.

Side note: I liked my hair this weekend. Maybe I should wear it wavy more often. 

Tuesday, June 11, 2013

Rain Boots

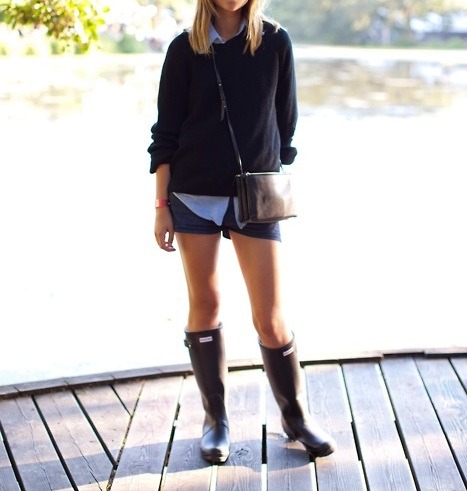
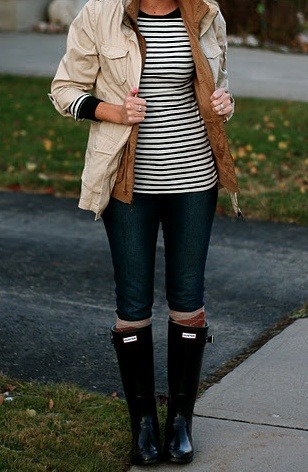
I've always wanted rain boots, but have always been told I don't need any here (lies!). Since it rained on Sunday, I started looking at rain boot inspiration and have decided I REALLY need some. 


Do you have rain boots? Do you love them?


Monday, June 10, 2013

Makeover Monday: Kitchen Cabinets

Today you are going to see pictures. Lots of pictures. Please be warned.

Since we moved in, I had decided that our oak colored cabinets needed to be a different color. I went back and forth between white and espresso. When we got Astro in October, I knew white was no longer an option - espresso it was. But I was nervous as crap to do the cabinets. What if I messed up? I don't have 15k to get new cabinets! So I put it off... and off... until February. At that point it was a now or never type of thing since we were getting our flooring done in March. 

So, I did it. I followed Monica's tutorial for the most part (except I ran out of socks) and it worked out pretty well. Though it did take a solid three weeks of working on it. Total hours into the sanding, staining and sealing was about 40. 

Here is what our kitchen looked like before I started the process (all photos are prior to us purchasing the house):


 The cabinets look fine here, but then again everything is beige, once we switched to grey, it wasn't quite as cohesive. 

Here is what the kitchen looked like throughout the process. There were times I got SUPER nervous:


See the progression? After the first coat I thought, "*Bleep*, what am I doing?!" But with each coat, things got better. I ended up doing 4 coats of stain and this is what it looked like when I finally put the doors back on:


Not so terrible, right? Here is a shot of the before and after next to each other:


Quite the difference! 

Then my cabinets stayed just like you see above until last week when I finally worked up the nerve to put hardware on. Once I started doing it, it wasn't so scary, but man - putting holes in things freaks me out! There's one drawer that's slightly crooked, but I'm blaming it on the drawer itself.


I still need to put two more handles on the fake drawers, I'm just trying to figure out the best way to do it since I can't get behind them to drill. Wood glue?


There you have it, that is our kitchen as of this morning. Progress!

Things that still need to be completed:

*Granite countertops
*New sink
*New appliances (stove/oven, dishwasher)

Have you ever took on any large projects in your house that you were scared to death to start?